After all the preparation and setting up, the day finally arrived to play out our first game on the new table and to complete the play testing of the "Vimeiro Light" two part scenario, having played the "Vimeiro Hill" game a couple of weeks ago at Legionary.
 |
| French Elite Company Men at the time of Ventosa |
My previous post outlined the terrain set up and the effort to create blocked sight lines around Ventosa, to enable us to try out some of the other concepts that need more work with, such as the "Reverse Slope" tactics as laid out in the rules. This together with the use of blinds would help keep the French commanders "in the dark" as to exactly what British troops, were where, at any given time until spotted, and simulate the British ambush potential.
 |
| Table Map |
 |
| British & French Orders of Battle |
The two sides are evenly matched with the French advantage of All Arms and slight Numerical Superiority, being countered by the British Quality and Command advantages, having a Senior commander (Fergusson) in charge of both brigades.
The lack of a superior commander with the French meant that Brennier and Solignac were forced to act independently, with Brennier appearing on the British left flank at any time between turns four to nine. I was hoping to try out the flank march system on C&GII, but made the error of putting Brennier in as Officer 101 which identified him to the programme as the Army Commander instead of a separate commander with just his force. Thus I couldn't detach Solignac and Brenniers brigades when giving the flank march set up. In version two of the order of battle I will put Junot in as officer 101 but obviously he will not be present in the battle. This should remedy the problem. Now you can see why I wanted to playtest these games before releasing any orders of battle I have put together!!
So rather than re-write the order of battle we turned to the old mark one die roll to determine the French arrival with a six being required on turn four, a five or six on turn five etc, etc.
The other innovation we tried out was to allow the British to place "blind" markers down in the positions their two brigades occupied on the table. Thus the French would still know where the British were, but not exactly what units were in the blinds represented and in what formation. To save on writing, Steve, the British commander simply laid out the troops on duplicate markers off table in the set up they would be in when placed on table. The blinds, sideways on, indicating a deployed brigade's maximum set up width with no limit on its depth. If the blind is placed end on towards the enemy it would be in manoeuvre mode, with the narrow end being the maximum deployment width and all units in company/squadron/limbered formation.
 |
| French cannon announce the arrival of General Solignac's men in front of Ventosa |
With the scenario briefing covered off together with Reverse Slope rules and Flank Marches we turned our attention to the best way of running the British Brigade Light Battalions. The issue we encountered in the Vimiero Hill game was that these battalions, being very weak in comparison to the French and British Line battalions are very vulnerable to French columns charging at them when performing their normal screening activities. If placed in open order they can be easily pushed aside before getting any chance to out skirmish the French Voltigeur screens.
Our remedy was to allow the British brigades to declare that the Lights were operating as brigade skirmishers, just like their Voltigeur counterparts. This meant that the Light Battalion could not be targeted for charges made by French columns. Any charge declaration would have to be made on a battalion in the brigade that the Lights were drawn from. This would allow the Lights to do their usual job of screening their brigade and sniping at the French, but also allow them to form up at any time and act as an independent light infantry unit capable of occupying important cover.
This approach in using the Light Battalions will need to be played to destruction to see if it works, more anon.
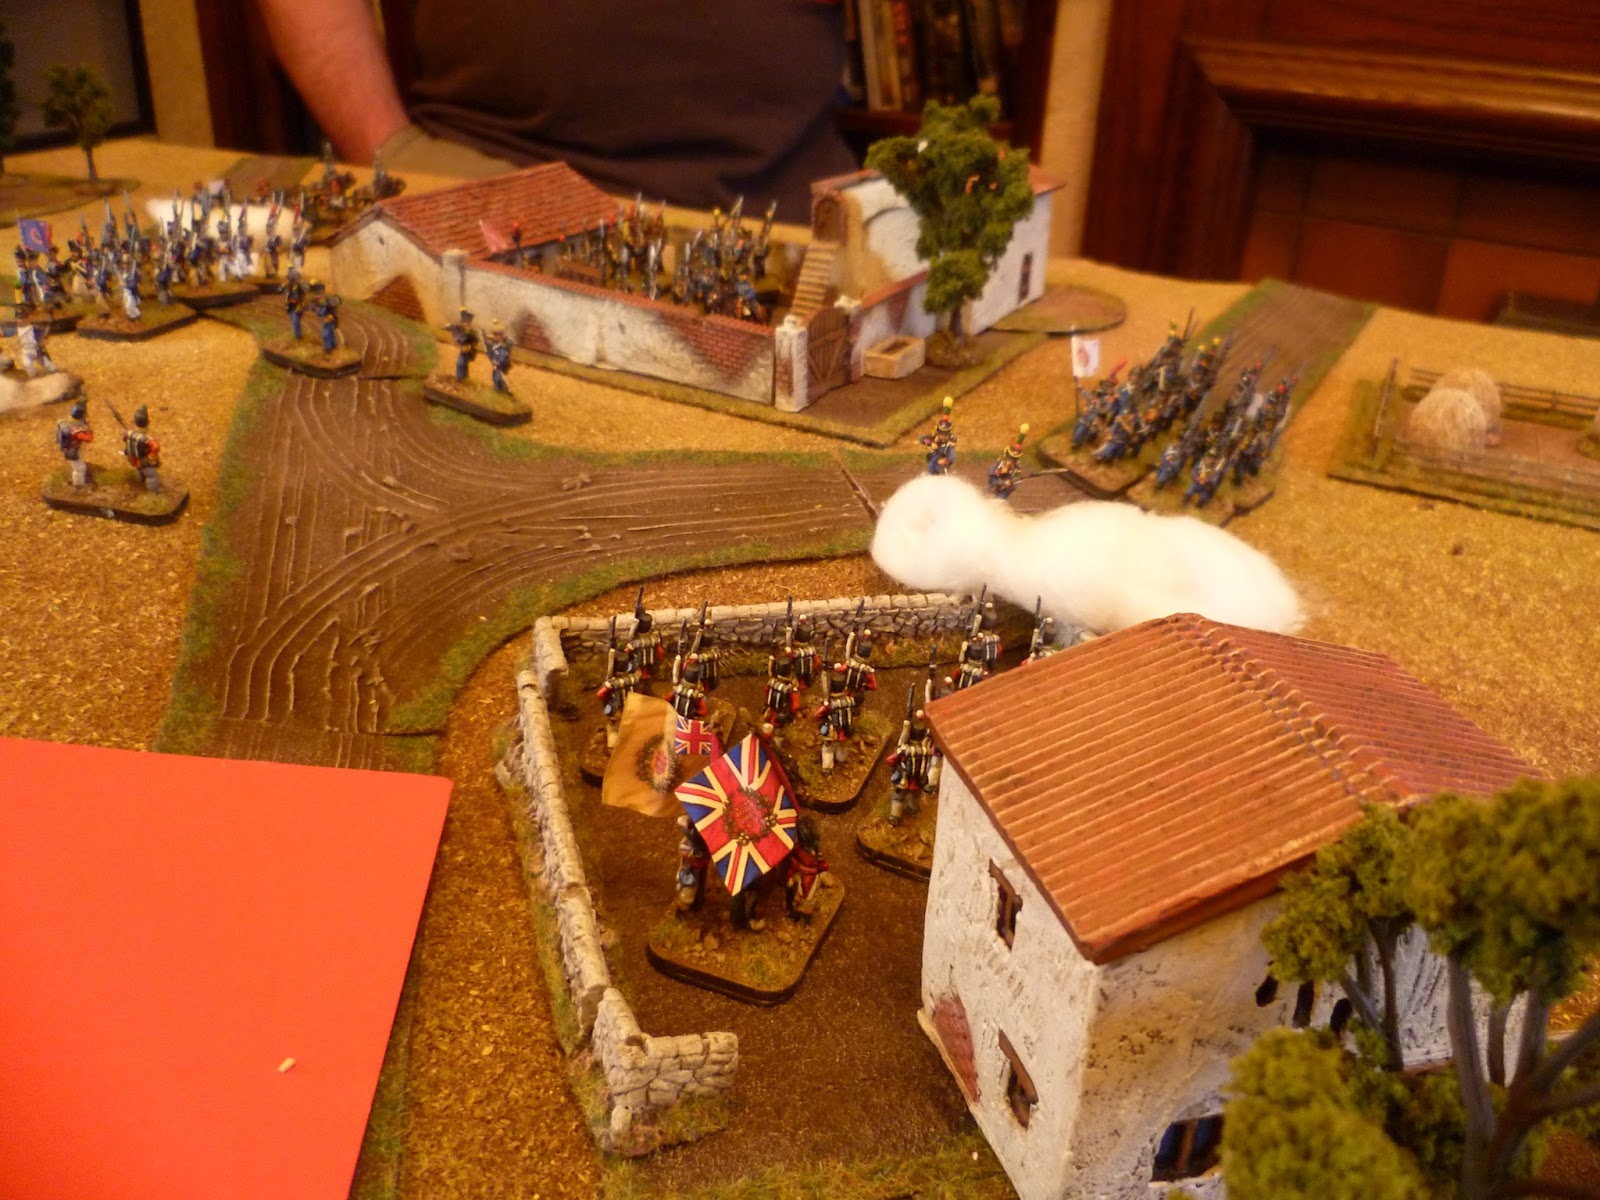
 |
| British skirmish troops and artillery welcome the French in return |
So to the game. The French were tasked with taking control of the ridge above Ventosa, by having more good order troops in occupation of it than the British, whilst avoiding their army having a morale failure before game end, turn twelve. The British were basically tasked with avoiding the French victory requirements.
The Ventosa ridge was identified as the ground between the village and three strategically placed small woods that gave a perimeter to it, thus making it very easy for both sides to keep the objective in clear sight.
 |
| French troops occupy the hamlet of Ventosa |
The game started with the arrival of Solignac's brigade in front of Ventosa toiling forward over the disruptive terrain that is the "Eastern Ridge". Thus by the third turn after some intial skirmish and artillery fire the three French columns were preparing to leave Ventosa and advance up the slope behind it towards the skirmishing redcoats of Nightingale's Light Battalion.
 |
| The French advance up the slope unaware of the British troops behind the crest |
The 58me Ligne lead the assault up the hill taking skirmish hits and canister fire from the British on the way. This barrage caused the French battalion to loose momentum and as it crested the ridge in sight of the British battalions behind its attempt to charge in failed and it was forced to deploy in line instead.
 |
| French guns engage in counter-battery fire as their columns advance |
 |
| The skirmish battle begins. |
Ironically the Light Battalion to its front was encouraged by this and given the option to counter charge whilst in open order. The British commander decided "discretion was the better part of valour" and declined the charge invitation , but feeling secure on the crest, decided to form line.
On reflection, this was probably not a good idea. The change from open order into line now presented the French with a much better target, which although they couldn't charge, they could shoot at.
The French unit, still organised on the pre 1808 nine company organisation, was extremely strong with just over 1200 men, and the volley it let loose at 75 paces was devastating, dropping close on 100 of the redcoats in one shot, and despite the return volley from the "light bobs" despatching close on 80 Frenchmen in return. the result was predictable with the British Light battalion routing back off the ridge, and the French battalion, retiring back towards Ventosa to lick its wounds.
Note to self , "Do not form Light Battalions into line in the open in front of strong French battalions and expect to out volley them, even if you have disrupted their charge attempt". In the words of my old school teacher, "It's not big and it's not clever!" I told you we were on the learning curve with these units.
 |
| Both sides kept up the artillery fire as the columns advanced up the slope |
The disappointing result of the British Light's running back was they had done a brilliant job of stalling Solignac's attack. The continual skirmishing backed up by the British artillery had caused the 58me Ligne to fall back, and had convinced the 12me and 15me Legere that they were better off in the cover of Ventosa hamlet, with both units refusing to leave cover or charge the 36th Foot who had moved into the British side of the village.
In addition their departure had unnerved their parent brigade and left them unable to skirmish offensively as they prepared their own counterattack.
On reflection perhaps it would have been better if the Lights had stayed in open order and fallen back behind their supports, before getting volleyed. Then returning to the fray after the French had been pushed back, as they would inevitably would have been, by the British line battalions on the crest.
 |
| The 36th Foot moved into Ventosa to contest the advance |
 |
| British Light troops swarmed over the Ventosa ridge picking off officers and NCO's |
So with events at a tipping point on the Ventosa front and the initiative moving from one side to the other each turn, indicating the swings in morale and fatigue, fate dealt another turn of events.
Tom was in command of Brennier's main force marching "to the sound of the guns". On turn four he managed to roll a one requiring a six, doh! Then on turn five, requiring a five or six he rolled a five.
Things had now swung towards the French.
 |
| At midday the troops of General Brennier advanced onto the table revealing the British position |
With the arrival of Brennier's battalions, the British positions were exposed to view by both Tom and Jack commanding the French. The new arrivals had caught the British reserve brigade in line, deployed facing Ventosa, thus requiring it to rapidly wheel to face the new threat.
Fortunately for Steve, Tom had led on his forces with his infantry rather than the 3me Provisional Dragoons. If these heavy cavalry had been first on then the problems for the British would have multiplied by the effect of limiting the complicated movements the redcoats were attempting to do in response to the new situation.
 |
| The 58me Ligne are staggered by the fire that the British put into them and attempt to form line |
 |
| Fighting for Ventosa "hots up" |
As it was the disruptive terrain that Wellesley had selected to place his infantry force in was helping to delay the French attack and giving his men the time to redeploy. General Bowes rushed his Light Battalion forward and to the left flank, skirmishing with the lead French battalions and taking possession of a small copse in their line of advance.
This move slowed the French attack still further and allowed the "light bobs" to fire at the French dragoons from the safety of the trees as they entered the table.
 |
| General Brennier pushes forward onto the British left flank |
 |
| General Bowes is forced to wheel in response to the new arrivals |
Meanwhile the attack on the Ventosa ridge had stalled with the forces under Solignac unable to advance on or charge the enemy. With both armies within one per cent of each other on the force morale score and only eight per cent away from either loosing the game the next decisions would be vital.
On turn seven the initiative lay with the British, and Steve decided to contest and "bottle up" Tom's advance on his left, whilst counter attacking Ventosa to his front. However given the objective of just holding the position, which the British were doing and given the fatigue on both forces, made worse by the disruptive terrain, perhaps moving to the attack was an order to far.
 |
| Nightingale's brigade moves onto the crest |
 |
| British gunners attempt to hold the French back whilst the infantry get into position |
 |
| The battle on the British left at its height |
As the British advanced on Ventosa the lack of a Light Battalion skirmishing to their front had its effect.
In spite of the Voltiguers sniping at them as they crested the ridge they pressed on towards thevillage.
They were met by the reformed 58me Ligne in line who were ably supported by the French guns. as the range came down to 150 paces both sides "let rip", but with the fatigue, all the units were now experiencing, the casualties were minor for both sides.
 |
| General Fergusson oversees the advance on Ventosa |
 |
| The 3me Provisional Dragoons feel out the flank of the British left whilst taking fire from light troops in the woods |
Meanwhile on the other flank the 70me Ligne charged the British guns who had turned to face the new threat, and after a brief exchange of musketry and canister the gunners fled from the French attack.
 |
| The pressure builds on the British left |
 |
| The French fight hard in front of Ventosa |
 |
| Close range volleys in Ventosa |
Suddenly on turn nine it was all over. With such a close affair it was not clear which side would crack first. The British morale failure flashed up and the French had achieved a "Minor Victory".
The last combats, although light in casualties had been enough to break the British force's will to continue the struggle, but the French army was only just slightly better off. As you can see the losses were fairly equal.
 |
| The 32nd Cornish Foot prepare to cover the withdrawl |
This was a very enjoyable battle to fight, with the variable French reinforcement adding to the replay value. We are still learning to master C&G and I come away from games with my head full of questions and thoughts about how to get the best out of the situations presented.
We all agreed that the rules are a lot of fun and the effects of fatigue, that you just don't get with other rule sets, really build in a limit to what you can expect your men to do in two and half hours of fighting.
As soon as I have updated the files for the game I will post them in the downloads section of the blog, so stay tuned if you are a C&G player and would like them.
Thanks to Steve, Jack and Tom for a great day of wargaming. Onward to Corunna!