Tuesday 26 April 2016

Fighting For Napoleon - French Soldiers' Letters 1799-1815, Bernard Wilkin & Rene Wilkin


Whilst away on my Spanish travels I took with me and finished this fascinating and somewhat tragic book capturing details from over 1,600 letters of French Napoleonic soldiers, most of which had never been published before.

In a period when mass literacy was still not a common feature in Europe, written accounts made at or close to the times described are relatively rare, especially amongst the lower ranks who unlike the more accessible memoirs of more senior French officers are not about securing their place or reputation for posterity; but more to do with recording the mundane aspects of day to day life that in the case of many of these unfortunate men might have been the difference between life or death.

The authors are father and son, with Dr Bernard Wilkin, a Belgian historian, based in my neck of the woods at Exeter University, where he specialises in the history of the French army and French people under Napoleon.

This book makes a stark contrast with the book I reviewed earlier this month, "From Corunna to Waterloo" and illustrates my previous point, in that the former, written by two articulate privileged British Hussar officers whose concerns differed hugely from these poor French conscripts, primarily focused on getting money from family to help them survive in a French army operating under Napoleon's crude methods of supply and logistics, based on letting war pay for itself. Some of these conscripts refer to their having to take part in pillaging civilian populations, trying to mitigate their role by pointing out that unlike their comrades they took nothing of significant value or very little loot.

These letters come from the collection of the Archives de l'Etat a Liege, where the prefecture of Liege kept the letters written by French conscripts from the Ourthe department, annexed by the French Republic in 1794, formerly part of the Austrian Netherlands. Many of these letters ended up in the hands of the authorities because families were keen to provide evidence of a family member already conscripted to protect another from forced conscription. The parents of draft-dodgers would also provide letters as proof of service to avoid the large fines that conscription avoidance could incur on them.

The French conscripts common theme - endless marching and fatigue from little sleep
Much of their content is similar and mundane, focused on sending their greetings to family and friends, obtaining money from home, letting loved ones know that they and friends in the unit were well and of others from their village or town who had died or were sick. Given the levels of illiteracy, many of the letters would have been written by those able to write down the thoughts and sentiments of their comrades and these men were often promoted to NCO's. There seems little concern over the content being read by the enemy if captured and the lack of censorship is noticeable to the modern reader.

The authors have gone through the letters, pulling out the information that was occasionally added to the normal format that illustrates the other day to day concerns and observations these French soldiers recorded.

The letters are then subdivided by pertinent content according to the six subject matter chapters,
  • Chapter 1 - Serving France, covering conscription, desertion and denunciation
  • Chapter 2 - Life in the Army, citizen to soldier, duties and events
  • Chapter 3 - War against the Austrians, Russians and Prussians, Marengo and the occupation of Italy, The wars of the third, fourth and fifth coalitions.
  • Chapter 4 - The Peninsular War, the conquest of Portugal and the Spanish uprising, Guerrilla warfare, Fighting the British and the campaign of 1811, The struggle of the French in Spain and the final collapse.
  • Chapter 5 - The Decline and Fall of the French Empire covering the Russian disaster of 1812, the German campaign and the final years of Napoleon's Empire
  • Chapter 6 - Wounds, Illness and Captivity - Fearing the hospital, captivity and suffering.
The examples of letters cover all the arms and includes members of the Line and Guard regiments. The content rather reminded me of similar letters from ordinary soldiers in WWII and probably illustrates the idea of the universal warrior, in that issues affecting the front-line soldier are a common factor from the siege of Troy to the plains of Afghanistan, that of keeping fed, and surviving. However the change in the confidence in the Emperor and the bravado expressed in the earlier years as time rolled on into the later Empire is well illustrated, and reminded me much of similar letters from German soldiers in WWII and their perspective of events in that war.

Where possible the authors provide footnotes at the bottom of each letter giving the background of the writer and their subsequent fate. Many would die on campaign from disease rather than battle and a common thread is the fatigue from constant marching and not enough sleep. Many of these men were young, illiterate, unskilled and taken away from their parents and thrust into an unfamiliar hostile world, forced to survive on their wits. Some of the letters, knowing the writers fate, make tragic reading for them and their loved ones; and given that nearly all common soldiers who died in this period ended up in an unmarked grave often miles from home and lost to their families and history, the book makes a fitting tribute to all the unknown soldiers of the period.

This book as well as being a good read is very welcome addition to the literature covering the experiences of the common soldier in the Napoleonic period and gives great insight into the view from under the shako. In addition I found the massive numbers reported taking part in the various battles described, together with the enormous casualties inflicted and the amazing spellings of place names conjured up by these men an inspiration for my own writing. I am already thinking of ways to include this historical touch into my own after action reports, although some of my gaming buddies think I do that already.

http://www.pen-and-sword.co.uk/Fighting-For-Napoleon-Hardback/p/11196

The book has 180 pages and is published by Pen and Sword at a retail price of 19.99 in hardback but is on offer by them at the time of writing at £15.99.

Monday 25 April 2016

Legionary Preparation - All Set and Ready to Go


This weekend has been taken up with the preparation for the Legionary show next weekend in Exeter.

I am quite keen to make the Napoleonic collection portable to be able to run some demo games away from the wargames room and so this will be a bit of a dry run to see what is possible.


The battle box has become a tried and trusted method of transporting the WWII collection too and from club so I thought I would see how the Napoleonics fitted in.

As you can see I can get The Pajar scenario forces plus game materials in the one tin, thus with just a box of scenery and the game mat, it makes it very portable.


Normally I wouldn't be taking a small screen with me but, as this is a demo game showing not just the collection but also C&G II, the screen helps show the system in action while we play


The weekend was capped off, as it would seem for many others if the comments on the various forums are concerned, with the receipt of my PDF copy of Sharp Practice II as part of my order that I placed pre launch, and I am now busy concocting plans for a suitable collection of figures to play them.

All set and ready to go

Saturday 23 April 2016

JJ's Spanish Delights

The Southern Grey Shrike or Iberian Butcher Bird
https://en.wikipedia.org/wiki/Southern_grey_shrike
https://www.birdguides.com/species/species.asp?sp=122083
https://en.wikipedia.org/wiki/Great_grey_shrike

JJ's Wargames has been off line for a few days as some much needed R&R was taken at JJ's Casa in Spain.

I love both Spain and Portugal offering great climate, food and scenery and Carolyn and I have been going back, mainly to the south, again and again over the years and brushing up on our rubbish "Spanish" speaking capabilities.

As regular "JJ blogesters" will know, as well as military history, natural history is a bit of a passion and I like to share some of the creatures encountered at home and abroad. Whilst out on a days cycle ride I took the camera to try at catch some examples of Murcian wildlife in this warm part of southern Spain.

The first thing that drew my attention was a long tailed bird using a telegraph wire as a perch, flying out over the dry scrub behind the beach and back. It was quite difficult to get close enough to picture, but I was quite pleased with the final attempt.

I wasn't quite sure what I was looking at but on closer inspection, that characteristic sharp pointed heavy bill reminded me of the Great Grey Shrike I have seen in more northern climes. This is the southern European relative, the Southern Grey Shrike. The Shrike has a more common name of butcher bird due to its habit of creating a larder by impaling small animals and insects on to barb wire or thorn bushes, very often to allow toxins and poisons to degrade before coming back to consume the unfortunate victim later.

Little Egret on the lookout for small fish in the shallows of the Mar Menor
http://www.avibirds.com/html/Little_Egret.html

We have Little Egrets common to the waterways in Devon, but I never tire of seeing these slender white heron like birds focused on catching their daily bread. This chap was pretty straight forward to picture at the waters edge, unlike the Common Turns that were performing "Stuka" like dive bombings into the sea behind at the same time.

Swallow Tail Butterfly basking in the mid-day sun - watch out for that Shrike
 http://www.learnaboutbutterflies.com/Britain%20-%20Papilio%20machaon.htm

I have never seen a Swallow Tail Butterfly in the UK, but they were in abundance on our cycle ride displaying their powerful gliding abilities as they moved between the thistle heads. They were quite tricky to photograph, constantly levering the wings up and down while in place, but I managed to get the camera on fast shutter to get this shot of the spectacular pattern on the wings. Quite a stunning insect.

Common to Southern Spain the large Egyptian Grasshopper or Anacridium aegyptium 
And finally, whilst walking the bikes through a particularly narrow scrub-land path, keeping an eye out for any basking adders I caught sight of several giant grasshoppers who had the same idea and winged back into the bushes on our approach, watching us as I moved in with the camera.

These chaps are big, unlike their British cousins, and carried a noticeable yellow stripe at the back of the head that allowed me to attempt an identification, insects not being my strong point.

The camouflage was amazing and once they had backed further into the undergrowth became totally invisible to the eye, despite trying to trace a likely path of retreat.

So back from the Iberian Peninsula I am fully rested and recharged, and have the 3/94e Ligne well under way. This weekend will be given over to getting everything ready for our display game at Legionary 2016 next Saturday

Happy St Georges Day and a dedication of this post to the Great Bard of Stratford, William Shakespeare who died, four-hundred years ago, on this day at the age of 52. I spent many hours as a teenager memorising lines from Henry IVth Part One for my O'Level English Literature and it left me with a passion for the plays; and it seems we are in for a treat with the next series of "The Hollow Crown" coming up on the BBC covering the Wars of the Roses from Henry the VIth to Richard IIIrd. Oh and I fall into the camp that says Richard was as guilty as hell, as the two Princes went missing on his watch, being a classic case of "the buck stops". I am looking forward to the comments on that one!

Next up will be a report from Legionary 2016 and a book review of some Spanish reading, "Fighting for Napoleon", French Soldiers' Letters 1799-1815

Wednesday 13 April 2016

The Fall of the Seleukid Empire 187-75BC By John D Grainger


This is the third book in a three part series written by Grainger and which covers the Rise and Fall of the Seleucid Empire. I read Book one sometime last year and it details what happened after Alexander had died in Babylon, how Seleucus then carved out an empire for himself and what happens to his immediate successors, Book one stops just as Antiochus III comes to the throne. Overall it was very interesting although the author, who is an expert on the cities of this area, spent a bit too much time going over the founding of each one (and there are a lot of them) making a section of the book a little tedious.

I skipped Book two (until I got it this month as a present) as it is solely about Antiochus III and I already knew much of his story. Instead I piled into Book three which as the title says above, is all about the fall of the empire.


Even after Antiochus III defeat by Rome at Magnesia the Seleucid Empire was still in a very healthy state, and big! All Antiochus really lost were his gains in Greece and some suzerainty over various Asia Minor petty Kingdoms; what would become Parthia was still under his control and with Rome having no further interest his only real concern was Egypt under the Ptolemy’s.

I think for this review I can do away with chapter and verse because the overall story is much the same, the same events more or less run through the next 110 years in a steady pattern of what those of us who still have hair would call “rinse and repeat”.

Book 3 starts in 187BC with the death of Antiochus III (whilst he was quietly pillaging a temple); he left behind a stable empire however this wasn't always a good sign. Over the following years whenever a King managed to get things running nice and smooth, they all decided that now was a good time to either have another go at the Ptolemy’s or to shore up the East and baring a few success’s it usually ended up badly with a sudden vacancy for the crown.

Antiochus III
And this is where the problems start.

Early on the kings had always managed to secure a strong succession with their designated inheritor already in place and who was supported by their own followers; it’s when the King meets an unexpected end that it starts the self destructive ball rolling. At first it is usually because the next king is under-age and their Regents then try to cling onto power or sometimes it’s that the Queen mother favours another son instead of the next in line. Civil wars now become common on the demise of a king and this weakens the empire bit by bit. This state of affairs gets even worse when it changes to being a perpetual battle between two different branches of the Seleucid family; each round of war increasingly weakens the Empire as they fight it out down through the generations

It is now that we start to see the splitting away of large chunks of land, first up are the Judeans, in earlier times their troublemaking had been met with force but gradually over the years the various Kings had to keep them sweet with concession after concession until they are able to more or less declare independence, in fact they are even able to expand outwards by taking over nearby non-Jewish cities. More importantly we also see the emergence of the Parthians who free themselves from
Seleucid control and then they too start expanding outwards but with significantly more success.

Whilst the Empire is still relatively strong these repetitive civil wars eventually get resolved in favour of one or other of the claimants, they then consolidate their power and decide that its time to do something about the East and the Parthians. This is always a disaster, the King is then either killed or captured and the whole process starts all over again.

Battle of Magnesia 190BC
With the weakening of the state, each subsequent civil war takes longer and longer to resolve, now we see individual big cities starting to break away until the southern half of the empire which is along the Palestine coast is for all purposes abandoned. Small city states in the north and east are also lost either to adventurers or as semi-independent sub-kingdoms of Parthia. Even in the core area the big cities like Antioch are demanding more freedom and self-control and which the hard pressed Kings are forced to give into so as to keep them on-side.

Finally in what is now Syria and the only significant part of the empire remaining, there is a civil war that cannot be settled, neither side is able to gather sufficient forces to defeat the other and so a stalemate ensues. The end of the Seleucid Empire draws near, and much to my surprise it wasn't the Romans who pulled the plug as had I previously thought.

With this final civil war at an impasse, it isn't long before a combination of both natural causes and by 'some not ducking at the right time' that we end up with Phillip I as the last of the rival Kings still alive, his kingdom is however now small and he rules what is in effect a collection of semi-independent cites with very little power. When he too dies a few years later his son is just a child so Tigranes of Armenia gets invited to take over what’s left of the Empire; invited or not he was probably coming their way anyway as he was in the middle of a big expansion drive. His method of
control was with a light touch (hence the invitation I suspect) he spent a few years sorting out the mess but sensibly left the powerful cities to run themselves, as long as they paid their taxes/tribute he was happy, along the way a number of inconvenient Seleucid family members became ex-Seleucids; then he left, never to return.


The Seleucid Empire was gone.

Meanwhile our friends the Romans who had little or no interest in the Seleucid Empire and apart from making a few meaningless platitudes to various dynastic rivals that had appealed for their help had generally kept themselves out of affairs in Asia Minor. However in the north, Mithridates of Pontus had been stirring things up for well over a decade by either attacking Rome’s allies or by trying to expand into Greece, also organising the massacre of 80-150 thousand Roman citizens didn't help win friends in Italy(see Asiatic Vespers ). In what was now his third war with them he convinced his son in law Tigranes to help him out; this was not one of Tigranes best decisions.

Mithridates of Pontus
The Romans decided to settle the matter once and for all and so sent a large army with good generals and soundly defeated them both, Pontus and Armenia were conquered and incorporated into the Empire. The Romans being the tidy sort that they are set about the complete restructuring of the East and this included what was previously the Seleucid Empire, Judea and everything up to the Parthian border.

All this may read more like a history rather than a book review but civil wars are very tricky to follow, especially if everyone is called Antiochus and there are thirteen of them!

Grainger does a good job in tracking each squabble especially given his limited resources, he relies a good deal in some places on coinage and his reasoning appears sound in most cases. The control of cities was key and as each major city had its own mint then he can track who was in power and at what time. When you capture a city then you need to let people know that you are now in charge, the best way to do this is to start making new coins with your face on them and fortunately for us there are plenty of examples which can be accurately dated. I also found interesting his comparison between Josephus’s accounts and that of I & II Maccabees.

There are a total of two maps and both are very poor, even worse than in Book 1. I am afraid this is getting a trend.

Overall then it’s a good read, it filled a gap in my knowledge regarding the Seleucids because after Antiochus III, I had more or less switched off. It also gave me some insight into several topics I had never considered:

How did the Maccabeans not only survive but expand? Their army was useless.

Where can I find more details to re-fight Early Parthian’s versus Late Seleucid? There were at least two big battles I wasn't aware of in quite major campaigns I also wasn't aware of.

If everyone is called Antiochus, who ducks when someone shouts look out Antiochus!
(Probably explains all the deaths).

Readable pages: 210
Priced at £19.99
Best price today ABE Books: £13.61
Book Review by Mr Steve.

Sunday 10 April 2016

2/94e Regiment de Ligne


As with several of the other regiments in Victor's I Corps d'Armee in the the Talavera campaign, the 94e Ligne provided a battalion component to the forces Napoleon mustered early in 1808 for his surreptitious invasion of Spain under the guise of taking action against Portugal for its resistance to the Napoleonic trade embargo against Britain, imposed on European nations whether in or out of the Empire.


The 94e Ligne detachment joined others in the formation of the 5th Provisional Line Regiment that as part of Marshal Moncey's Corps d'observation des Cotes de l'Ocean crossed the Spanish border on the 8th January 1808 in the wake of Dupont's 2nd Corps d'observation de la Gironde as the French took control of the Bayonne, Burgos road into Spain preparatory to a march on Madrid.


French Corps d'observation des Cotes de l'Ocean, lst January l808 - Source Oman
Commanding Officer: Marechal Moncey

2nd Division: General de division Gobert
lst Brigade: General de brigade Lefranc
5th Provisional Line Regiment (Battlion)(Officers/Men)
l03rd Line Infantry Regiment (l)(8/44l)
64th Line Infantry Regiment (l)(l0/409)
39th Line Infantry Regiment (l)(8/507)
94th Line Infantry Regiment (l)((9/4l6)
6th Provisional Line Regiment
70th Line Infantry Regiment (l)(l0/5l2)
27th Line Infantry Regiment (l)(8/374)
lllth Line Infantry Regiment (l)(7/324)
95th Line Infantry Regiment (l)(l0/343)


The activities of French forces involved in this first French invasion can be followed in the previous posts on other regiments by following the link.
2/63e Regiment de Ligne


With the rising in Madrid or "Dos de Mayo", and Dupont's defeat at Bailen in the summer of 1808, the 94e Ligne were part of the troop concentration ordered by the Emperor to restore his position in the Peninsula and were brought up to a full three battalion regiment, joining Marshal Victor's I Corps d'Armee in the 2nd Brigade under General de Brigade Jaques Puthod under General de Division Villatte's 3rd Division.

The battles of the 94e Ligne in the second invasion of Spain 1808-09 up to Talavera
French Army in Spain, 15 November 1808 - source Oman
Commanding Officer: Emperor Napoleon
I Corps: Maréchal Victor
3rd Division: Général de division Villatte
Brigade: Général de brigade Pacthod (Battalions)(Officers/Men)
27th Légère Regiment (3)(50/1,527)
63rd Line Regiment (3)(44/1,246)
Brigade: Général de brigade Puthod
94th Line Regiment (3)(54/1,627)
95th Line Regiment (3)(47/1,428)

General de Brigade Jacques-Pierre-Louis-Marie- Joseph Puthod
General Jacques Puthod


The 94e Ligne would see action under General Puthod's command at the battles of Espinosa 11/11/1808, at Ucles 13/1/1809 and at Medellin 20/3/1809 prior to its participation in the Talavera campaign. All these actions together with the second invasion of Spain have been covered in previous posts and can be followed in the link above to the post on the 2/63e Ligne.

The Battle of Medellin in March 1809, the third French victory for the 94e Ligne in six months of fighting in Spain, prior to Talavera
Thus the 94e Ligne were well accustomed to conditions and warfare in Spain by the time they took there position in the line at Talavera.


My 2/94e Ligne is composed of figures from the AB range and the 2nd battalion fanion is from GMB Flags.

Post Script to this post:
If you have been following the Talavera project and the Vimiero and Oporto projects that preceded it and would like to see part of the collection in action using "Carnage & Glory II", I will be running a demonstration game, "Attack on the Pajar Vergara Redoubt" at Legionary 2016 in Exeter on the 30/4/2016. So if you are able to, come along and say hello.

http://legionaryshow.co.uk/

Attack on the Pajar Vergara run last December


Talavera - Attack on the Pajar de Vergara

Wednesday 6 April 2016

From Corunna to Waterloo - Gareth Glover


It was back in January, that I mentioned this book, partly read when I travelled up to Penarth for the Crusade 2016 show and listened to the author Gareth Glover talking about his research into events during the Waterloo campaign. Gareth kindly autographed my copy.


Since then I have been tied up with various projects that required more reading and so my leisure reading has been somewhat curtailed. However I was determined to finish this book because I really enjoyed it and also to give you my impressions.

The book is a collection of letters and journal entries written by two officers in the 15th Hussars, namely Major Edwin Griffith and his nephew Captain Frederick Philips with by far the greater contribution being made by the former; who regularly kept his journal updated through the Corunna, Vittoria and Waterloo campaigns, the last of which saw Major Griffith sadly killed during the latter stages of the battle.

In between the Corunna campaign and the Hussar brigade's return to Spain and Portugal in 1813, the officers recorded their day to day activities on home duty and the policing requirements made, particularly on the light cavalry regiments, to maintain law and order at home.

What makes this book particularly interesting is that the letters and journal entries, recording the combats and other events, were made on or very close to the time they occurred and so carry added weight to the descriptions recounted.

15th Hussars charge at Sahagun 21/12/1808, shouting "Emsdorf and Victory" - J.P. Beadle
Plan of the Combat at Sahagun
Probably one of the most famous cavalry actions, certainly of the Peninsular War, was the combat at Sahagun in December 1808 and Griffith's gives a detailed account of the march to combat and the manoeuvres made by the two sides prior to coming to grips.

Griffith, who was a troop commander during the 1808 campaign, provides the kind of detail that anyone wanting to re-fight this action would dream of;

"Trusting to their superiority of numbers, and to their advantageous position in a vineyard, with deep ditches, blinded with snow in their front, they foolishly stood their ground, hoping as they afterwards told us that the vine boughs or ditches would have thrown down all our horses, and that they should make easy work of us; they also gave us a volley from their carbines as we were coming up which killed and wounded a few of our horses......."

Following this there are equally vivid descriptions of the French pursuit and British rear guard combats including the capture of General Lefebvre as the Guard Chasseur a Cheval were roughly handled at Benavente on the River Elsa.

Benavente - Mark Churms
As well as the combats there are descriptions of the country, the food and people that were encountered, and it would seem that the the local population and the houses they stayed in during their travels did not impress.

By 1813 when the 15th Hussars returned to active service and joined Wellington's Peninsular army prior to his lightning campaign of that year, the now Major Griffith was in command of the regiment with his commander Colonel Calquhoun Grant in command of the Hussar brigade (10th, 15th and 18th Hussars). What follows in the journal entries are some very detailed accounts of the route of march and the clashes with French cavalry as they are forced to fall back before Wellington's army. The journal then takes the reader on to Vittoria, the fighting on the Pyrenees and the pursuit into France and battles prior to Napoleon's first abdication.

The accounts and letters keeps that "first person in the moment" style of writing as Griffith's describes events and his interpretation of them with, for those less familiar with the actions, Glover's useful notes at the bottom of the page letting the reader know what was actually happening.

Each place visited is recorded meticulously throughout the book making it a rather interesting and straightforward task of plotting the movements of the regiment at various points along the march, whilst considering the time taken to cover the distance. I was quite interested to see the route taken by the Hussar brigade in 1813 as Wellington began to muster his forces close to the Spanish/Portuguese border, and I recorded the position markers on Google Earth as seen below.

Route of march by Major Edwin Griffiths, commanding 15th Hussars, 1813
As mentioned earlier, a really useful aspect to following the accounts provided by the two officers is Glover's addition of including reference notes at the bottom of the pages about individuals and places mentioned on the page, so you don't lose your place or the context, checking out which individual or place is being referred to in the text.

In addition there is a very comprehensive index at the back for future reference if, like me, you are needing to check out the finer details of a particular cavalry action that you want to fight.

One aspect that I particularly noted and bears reference to my review of  Ian Fletcher's "Galloping at Everything" was the discipline and good order displayed by the Hussar brigade, when several times in the accounts on the pursuit of the French to Vittoria, the French cavalry force is over turned in combat and the hussars rally back on their supports when ordered.


Additionally the notes about the pursuit by British cavalry after the battle make interesting reading showing that the 10th and 15th Hussars did make a vigorous pursuit of the beaten French forces with the 18th Hussars failing to support their brigade comrades by stopping to loot the French baggage. Indeed Wellington severely reprimanded the 18th for their behaviour and the regiment was not granted the honour "Vittoria".

Likewise at Waterloo, the 15th are recorded making a determined pursuit of the French from the field of battle, demonstrated by the greater proportion of casualties for the day being incurred during that pursuit before they handed the task over to their fresher Prussian allies. 

Gareth Glover is to be congratulated for his contribution to a better understanding of these actions fought two hundred years or more ago, by bringing first hand accounts like this to the general reader seeking a better understanding and to the discerning wargamer keen to bring that understanding to their table.

A jolly good read.

Other references:

Saturday 2 April 2016

Portsmouth Historic Dockyard

Vice Admiral Horatio Lord Nelson
The final leg of our Easter Weekend trip took in a visit to the historic dockyard at Portsmouth, home of the Royal Navy.

I have visited the dockyard several times in my lifetime and each time it seems there is yet more to see. So much so that we bought a family ticket that lasts a year which we intend to use for a further visit to see displays we didn't have time for and those displays such as the Mary Rose which were having further work done on them prior to the start of the main tourist season and so were not open this time around.

I am sure many of the sights will be very familiar to you and so I have just grouped together pictures of the day that particularly grabbed my attention, with occasional comments that I hope will inform and entertain.

The header to the post is a reconstruction of the face of Lord Nelson based on life mask and really does capture the look of the famous British admiral. I am of an age to remember when British history was taught in a linear way in school and as kids we were all brought up with the military landmarks in British history starting with Julius Caesar coming to Britain, Alfred the Great burning the cakes, 1066 and the Battle of Hastings etc. The story of Britain's greatest admiral and naval hero was one such historical landmark which entailed several weeks of project work culminating in a school trip to Portsmouth. 

Over the years I have read more about the man behind the story and unlike say Wellington, another British military giant of the era, Nelson comes across as a much more likeable, personable fellow who unlike Wellington, was loved by the men who served under him as demonstrated by the outpouring of grief at his loss.

His legacy was to grant Britain not only a victory to offset Napoleon's victory a month later at Austerlitz and sow the seeds for the eventual downfall of the French Emperor with all the success Wellington would enjoy in the Peninsular War and Waterloo, but also almost uncontested mastery of the seas for almost one hundred and fifty years following the Battle of Trafalgar which led to the creation, for better or for worse, of an empire that covered three quarters of the globe and supported the growth of British trade following the industrial revolution. 

The naval tradition he and his victory engendered effected the defence of the country through two world wars and fostered a fighting spirit in the Royal Navy that lives today in the modern service.

I think therefore it was fitting to give Lord Nelson pride of place at the top of the post as it is perhaps more to do with his amazing career and genius in battle at sea, together with it being the home of his famous flag-ship, that Portsmouth Historic Dockyard is the landmark tourist attraction it is today.

That said there is an awful lot of stuff to see other that the Nelsonian related items and so I hope you enjoy this montage of pictures from the day.

The historic old gateway that greets visitors entering the dockyard seems often to be ignored by them in their haste to see the main attractions. I would love to be able to see the sights this old gate has witnessed over the centuries.
The history of Portsmouth as a British naval harbour dates back 1,200 years to the 860's and the base established under King Alfred for his fleet to police particularly the channel shore from Viking raiders. Even before Alfred's time, the Romans had recognised the importance of the anchorage and had established strongholds close by to protect the entrance, these being reinforced still further during Saxon times. The first permanent fortress, Porchester Castle, was built after the Norman conquest in 1066.

As you pass through the ticket office you are immediately in front of the wharf in front of Boat House number four, that leads down to HMS Warrior. However my eye was immediately drawn to these two WWII veterans, beautifully restored to their former glory.

Motor Gun Boat 81, built in 1942 by the British Powerboat Company, Hythe
MGB 81 spent a lot of her time in the Channel and was based at Dartmouth at one time as part of the 8th MGB Flotilla.

  • 1942 Built by the British Power Boat Co. as a Motor Gunboat
  • 1942 After extensive trials, joined the 8th MGB Flotilla at Dartmouth
  • 1942 Close range gun attack on two German armed trawlers off Guernsey
  • 1943 After escorting minelayers, contacted a German convoy north of the Hook and engaged the escorts
  • 1943 The 8th Flotilla again moved to Dartmouth and the vessel was refitted at Brightlingsea
  • 1943 Damaged in a collision with MGB 115 and repairs carried out at BPB Poole. Later damaged in an engagement off Cap de La Hague and again repaired at BPB Poole
  • 1943 Re-designated MTB 416 with two 18 inch torpedo tubes
  • 1944 Refit at BPB Poole after which she vectored onto and engaged five E-Boats in Lyme Bay, suffering damage
  • 1944 Took part in the D-Day landings and later attacked a German convoy leaving Cherbourg, during which an AB was killed
  • 1944 Attacked enemy R-Boats off Cap d’Antifer in which the CO was wounded and the vessel damaged. Further repairs at BPB Poole followed by further action
  • 1945 Approved to lay up in Category “C” Reserve at Poole, followed by final paying off.

High Speed Launch 102 was the kind of craft kept busy rescuing downed aircrew in the Channel during Dunkirk and the Battle of Britain in 1940
http://news.bbc.co.uk/1/hi/england/hampshire/8505534.stm


HMS Warrior
Built to counter French naval developments and the launch of the French ocean going iron clad warship La Gloire in 1859, the launch of HMS Warrior in 1860 embodied the revolution in ship design that spanned the eras of wood, iron, sail and steam.

At the time of her launch she was the largest, fastest, most powerful warship in the world and following an £8 million restoration in 1979 was saved for the nation after avoiding being scrapped and ending her days as an oil jetty in Milford Haven.

HMS Warrior (1860)

HMS Warrior under sail


HMS Victory
The following set of pictures should need no introduction from me. Sadly at the time of our visit HMS Victory was going through a mast and rigging refit and so I have confined my pictures to the hull and interior of the great old lady.

This is about the fourth time I have toured the Victory and I always come away with a deep admiration for the men who lived in and crewed these great ships that became known as the "Wooden Walls of England".

HMS Victory was a 104 gun First Rate Ship of the Line, launched on the 7th May 1765 at Chatham in Kent and commissioned into the Royal Navy in 1778.

Her Battle Honours include Ushant 1778, Ushant 1781, Cape Spartel 1782, Cape St Vincent 1797 and Trafalgar 1805.

She displaced 3,500 tons and could move under full sail at about 8-9 knots and she would have had a full compliment of crew numbering 850 men including just short of 100 Royal Marines.


The twelve pounder gun deck, with thirty of these guns on the upper deck, plus another fourteen on the quarterdeck and forecastle, plus two sixty-eight pounder carronades for good measure


Fine Wine, Madeira and Port, part of the comforts for the officers. I love the way that these decanters were designed to occupy their space perfectly within the chest.
The twenty-four pounder gun-deck - twenty eight of these guns on the middle deck


The ultimate in AGA cookers

And finally, the thirty-two pounder gun deck with thirty of these massive guns on the lower deck
The plaque marking where Lord Nelson died  

A great quote on the last words between Captain Hardy and Admiral Nelson, taken from The Battle of Trafalgar by Geoffrey Bennett;
After almost an hour after his previous visit Captain Hardy was able to come down to the now crowded cockpit for a second time. Clasping Nelson's hand, he congratulated him 'even in the arms of death on his brilliant victory which was complete, though he did not know how many of the enemy were captured, as it was impossible to see every ship distinctly.''However', he added,'I am certain of fourteen or fifteen surrendered.' 
'That is well,' answered Nelson, 'but I had bargained for twenty.'

The facts of the battle were to prove Nelson's calculation unerringly close to the final numbers taken.


The final tally for the Battle of Trafalgar shows what a crushing defeat Nelson's fleet managed to inflict:

British Ships Involved: 33 (27 Ships of the Line, 6 Others)
French Ships Involved: 26 (18 Ships of the Line, 8 Others)
Spanish Ships Involved: 15 Ships of the Line

Casualties and Losses:
British: 458 Dead, 1,208 Wounded.
British Total Losses: 1,666 men

French: 2,218 Dead, 1,155 Wounded, 4,000 Captured, 10 Ships Captured, 1 Ship Destroyed.
Spanish; 1,025 Dead, 1,383 Wounded, 4,000 Captured, 11 Ships Captured.
Total Franco-Spanish Losses: 13,781 men and 22 Ships (3,000 men drowned in the post battle storm)

Source: Adkins - Trafalgar, The Biography of a Battle

The view from the deck of Victory provides a good panorama of the rest of the dock yard and some of the other display vessels together with ships from the modern Royal Navy.

HMS M.33, the sole remaining British veteran from the Dardanelles campaign of 1915-16 and the Russian Civil War and one of just three British warships from World War I. On the list for a future visit
Portsmouth is still a major operating base for the Royal Navy as evidenced by the futuristic shape of HMS Diamond
a Type 45 Daring Class air-defence destroyer
I was working in Southampton in the early 80's when Margaret Rule and her team supervised the raising of Henry VIII's flagship, the Mary Rose and I well remember joining colleagues around the hotel television to watch proceedings on the day as the first parts of the wreck broke the surface of the water on the cradle that brought the remains of the ship to the surface and very gently moved it towards the support ship.

Sadly Doctor Rule passed away last year but her legacy lives on and I was really looking forward to seeing how things had progressed on the amazing restoration work carried out on the wreck and the many artefacts that surfaced with the ship.

The £27 million Mary Rose Museum as seen from HMS Victory, Purpose built to allow the remains of the Mary Rose to dry out gently over the next few years.
The visit to the Mary Rose exhibition was not to be, due to work being carried out at the time of our visit and so it is on the list of must do's on our return.

Mary Rose by Geoff Hunt
We did however take time to check out the limited items from the collection that were on display at the entrance to the Mary Rose hall and Will kindly posed with his Majesty King Henry VIII, holding an actual long bow, one of several, recovered from the wreck.

King Henry seems unimpressed by the familiarity shown to him by one of his archers
After a much needed tea and cake break in the Mary Rose restaurant, we next headed for the National Museum of the Royal Navy.

I am a sucker for great looking ship models and they have always provided me with inspiration when producing my own wargaming models and the museum is one of those places to get inspired.

In addition there are some wonderful artefacts on display that really bring to life the period of the age of sail together with a very specific display looking at Lord Nelson, his life and a scholarly attempt to show how the great man would have appeared.

HMS Victory - 1805
Probably one of the best models on display, with an awe inspiring attention to detail
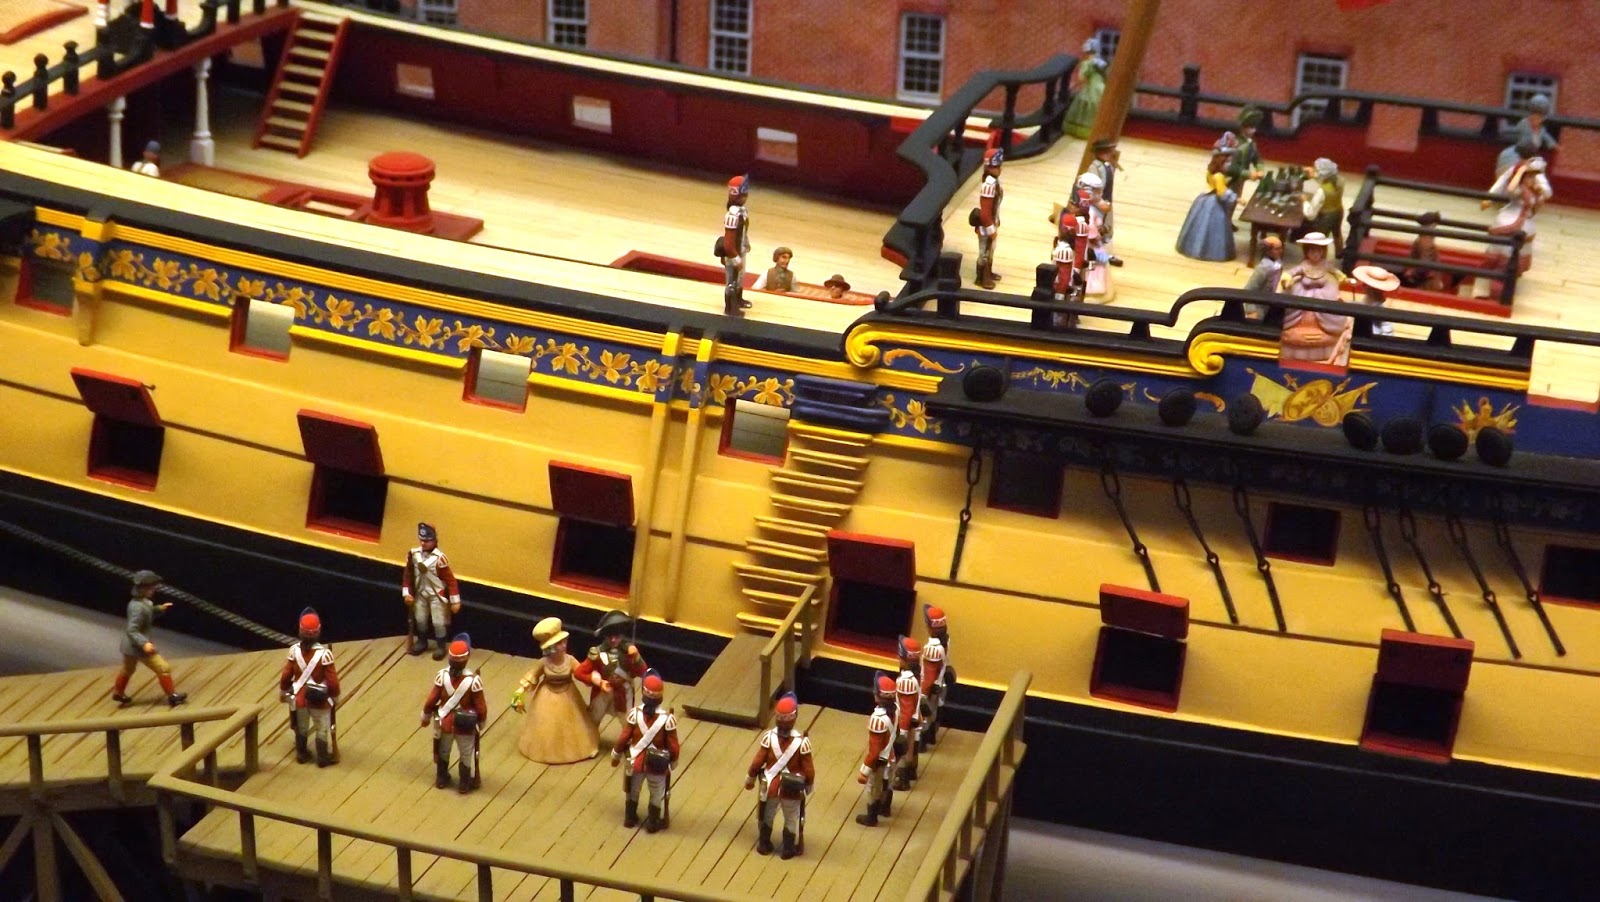
Check out this fantastic model by Clive Knight showing the launch of HMS Warrior in 1781
The Launch of HMS Warrior - 18th November 1781 Portsmouth Dockyard
(The traditional flags are flying from sheet poles where her masts will be placed, including the red flag with fouled anchor of the Admiralty Board and the Royal Standard.)

The model is described:

"A crowd of dockyard workers and their families is gathering on the quayside, as the invited guests arrive in their carriages. Drinks are being served on the quarterdeck, while a small band plays patriotic music."


I have played quite a few of Age of Sail games and have have a sizeable collection of Langton models based on the Hughes vs Suffren campaign in the Indian Ocean.

My fleets in action during the Battle of Providien 1782 at the Devon Wargames Group
Devon Wargames-Battle of Providien
Devon Wargames-Battle of Sadras

When the two fleets are on the table with opposing commanders issuing orders to their ships to open fire, it is worth considering what in reality the two sides would have been hurling at each other.

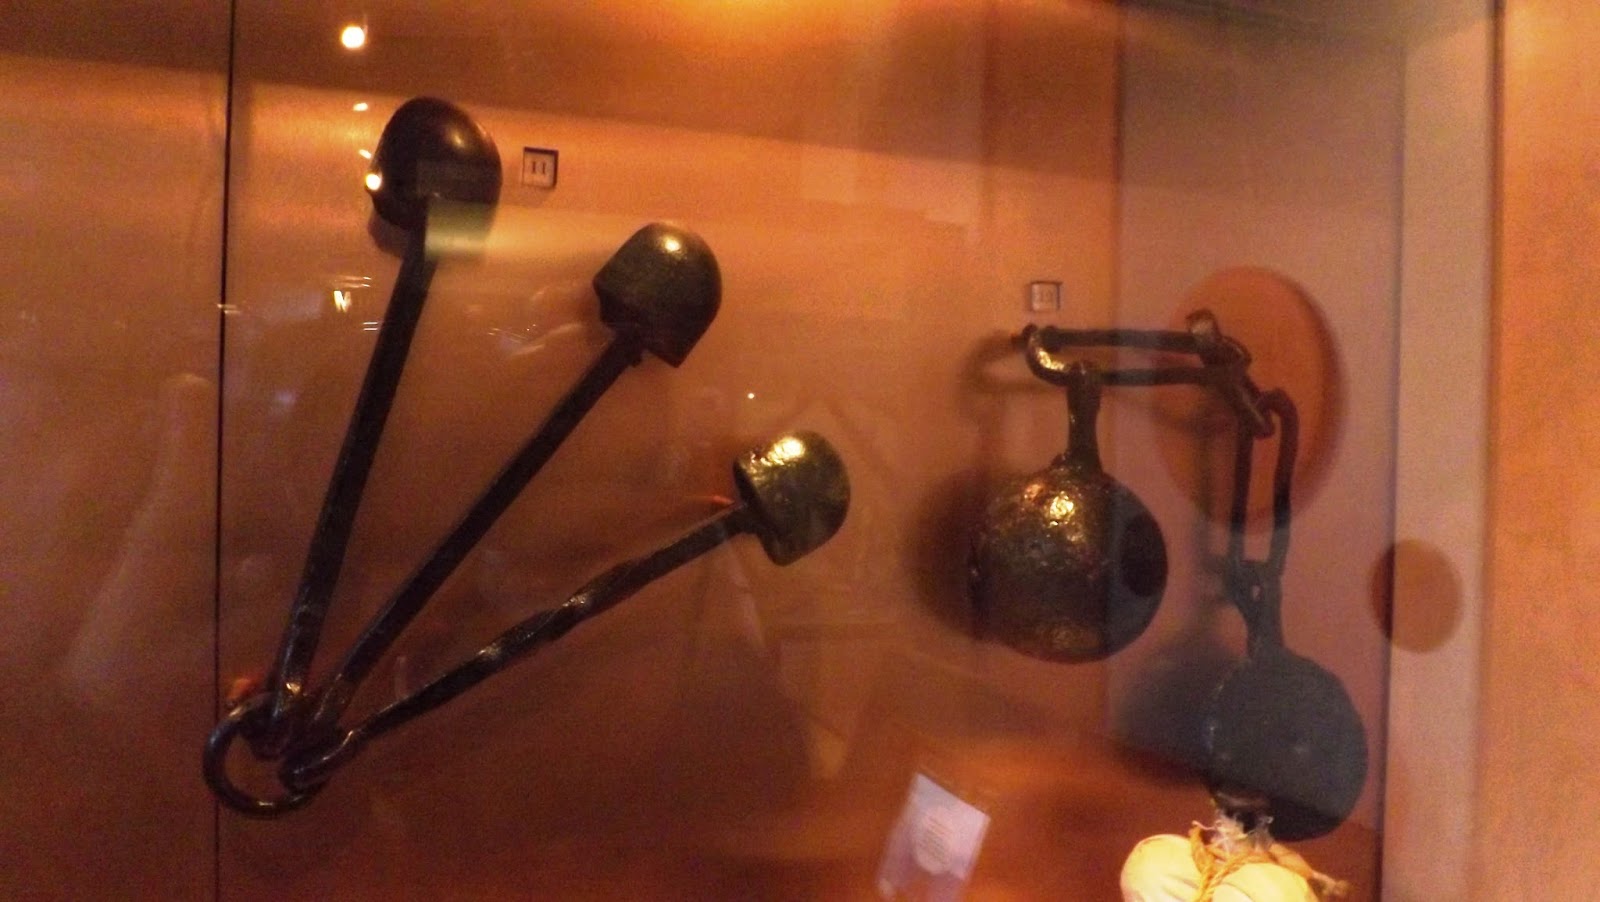
Elongating and Bar Shot for taking out enemy rigging
Star shot and Chain Shot, more anti rigging projectiles - The star shot (left) on leaving the gun would fan out like a star and whirled through the air - terrifying stuff! 
Flintlock firing mechanism, faggot shot and grape shot - anti-personnel rounds; the faggot shot consisted of small metal blocks bundled together  like faggots of wood that would fan out in a lethal swathe on leaving the gun. Likewise the grape shot would perform similarly, this being a grapeshot for a 24 pounder gun.
Round Shot - Right to Left, 32 pound, 24 pound and 12 pound. Principally used against the hull to take out men, guns and cause as much damage as possible to the structure of the enemy ship.
HMS Pickle under the command of Lieutenant Leponotiere brought the first news of the Battle of Trafalgar into Falmouth harbour on the 4th November 1805.

The little ship was also involved with the other small British ships in rescuing French sailors from the Achille a particularly risky mission as the French ship was on fire and its main guns kept "cooking off" as they became heated before the ship finally exploded and sank.

In all they rescued about 100-200 men and two women one of whom was found naked clinging to an oar and given a pair of trousers by one of the British matelot's.

The prisoners on Pickle outnumbered the crew three to one and were heard plotting to take over the ship and make for Cadiz, but the British crew kept careful watch and made it home safely.

HMS Pickle Royal Navy 6 gun cutter that delivered the news of Trafalgar to the Admiralty
Portrait of John Richard Lapenotiere as a Post Captain in 1815
The Captain lived at Liskeard in Cornwall and the miniature was
painted by James Leakey of Exeter

One aspect that has often bedevilled command and control at sea has been the difficulty for a commander to issue orders and messages ship to ship where the sheer difficulty imposed by the separation of vessels on water together with limited visibility have combined to severely restrict what a naval commander could hope to do with the ships under his command once the enemy was located.

I have been slightly surprised and bemused at some wargame rule sets, supposedly modelling the age of sail period, simply ignore this problem, with multiple ships operating in groups as if using ship to ship radio or other modern communications; perhaps a case of "fast play" taken to extreme.

Nelson was famous for his simple pre-battle order of sailing plans and allowing his captains to use their initiative whilst working within the overall plan, whilst other commanders simply required their captains to maintain their station in the line of battle.

I like to include this aspect into my fleet action games with stand off frigates passing a limited signal selection along the line of battle before a fleet can attempt to make a sailing change, with all the inherent chances for that action to go wrong .

Captain Sir Home Popham 1762-1820
Captain Sir Home Popham deserves special mention for his pride of place in the annals of naval signalling and communication and the adoption by the Royal Navy of his "Telegraphic Signals and Marine Vocabulary" code in 1803 allowing as it stated "freedom of speech" using signals.

The new code allowed for common words in the vocabulary to be allotted a number allowing it to be signalled with a simple combination of two or three flags whilst also allotting numbered groups of flags to the alphabet thus allowing other words to be spelt out when required

Nelson instantly recognised the importance of Popham's code visiting the newly appointed Second Secretary at the Admiralty, John Barrow, twice before leaving England in September 1805 to ensure that Popham's code was supplied to his fleet.

Captain Blackwood would later write to his wife from the frigate Euryalus off Cape Trafalgar on 1st October 1805;
"At this moment we are within four miles of the enemy and talking to Lord Nelson by means of Sir H. Popham's signals."


HMS Euryalus by Geoff Hunt
The new code would also allow Nelson, three weeks later to, "amuse the fleet with a signal" whose words are are as immortal as his name "England expects ......"

The Battle of Trafalgar rather like the Battle of Britain over one hundred years later was an existential battle for the British nation in that failure in either presupposed an invasion by either Napoleon or Hitler and the stamping out of further resistance by occupation and assimilation into a greater empire.

It is therefore not surprising to see the lavishness heaped upon the captains involved in the battle with the award by Lloyds of London of these £100 presentation swords to all of them involved in the battle.

Awarded to Captain Richard Lee of HMS Courageaux. Four French ships
escaped from Trafalgar. On the 4th November they were captured by a British
Squadron under Sir Richard Strachan. Captain Lee in the 74 gun Corageaux
captured the French 74 gun Scipion.
Awarded to Captain William Prowse of HMS Sirius
https://en.wikipedia.org/wiki/HMS_Sirius_(1797)

HMS Sirius 36 guns in action in 1798 against the Dutch Furie
I visited the tomb of Nelson many years ago at his final resting place in St Paul's Cathedral and his funeral procession was a state funeral with Nelson's coffin conveyed to the cathedral on the barge you can see below.

"Nelson's coffin lay in state in the Painted Hall of Greenwhich Hospital. From there it was taken by barge to Whitehall on 8th January 1806, to rest the night in the Captain's Room in the Admiralty. Next day Nelson received a state funeral in St Paul's. Thirty-one admirals and one-hundred captains followed his body to the cathedral....... He was buried in the cathedral's crypt beneath a marble sarcophagus inscribed only with his name and the dates of his birth and death..."


Around Nelson's funeral barge are displayed examples of ships figureheads, the embodiment of the spirit of the ship and reflecting a practise dating back to ancient times.

The carved figurehead fell out of favour after 1800 due to the impact the large sculpts could have on a ship's sailing qualities not to mention the associated costs, making a small comeback after the Napoleonic wars, until being finally discarded in favour of ship crests or badges displayed on the superstructure.

HMS Bellerophon has featured several times on the blog last year
due to her association with the surrender of Napoleon in 1815 and the 'Billy Ruffian'
dropping anchor off Devon on her progress to St Helena. It was great to see her
figurehead has survived.
HMS Calliope, Brig/Sloop launched in 1808
HMS Apollo 46 gun frigate launched in 1805
The Battle of Trafalgar model used to be in a glass cabinet that you could walk around and see in broad daylight through the large Georgian sash windows of the museum.

It has now been incorporated into a visual display presentation that takes the visitor through the key features of the battle, giving a very good visual summary but making it much harder for folks like me who wanted to get some good pictures of the model.

In the lighting conditions and with a ban on flash photography this was the best I could do. However it still provides fresh inspiration to the inner wargamer.


The final gallery we spent time wondering around before heading for home was dedicated to the life and times of Lord Nelson the man, with a focus on the personal affects and the look of the man, together with items that reflected the relationships in his life.

I really enjoyed this gallery in particular as I think it is through these more personal reflections that we as modern viewers over two hundred years later can get a little closer to knowing the man behind the public image.


Sample letters showing Nelson's handwriting which to the modern eye seems very legible and easy to read.

Nelson's extending armchair c 1770 - A notoriously bad sleeper, Nelson used the armchair for catnaps in his day cabin
What did Nelson look like?

For many years the this mask of Nelson's face was believed to be a death mask but more recent research has revealed it to have been taken from Nelson's live face in Vienna in 1800.


The live mask makes interesting comparison with that seen below of Nelson after his death aboard Victory five years later.


And finally the reconstruction, based on the live mask seen above, of a petite man with a very sympathetic face and piercing eyes .


The figure is based on the latest research into Nelson's appearance and shows him in the last few weeks of his life before the Battle of Trafalgar at the age of 47.

He is depicted in the undress uniform of a vice admiral, which he wore every day carrying the four orders of knighthood on his left breast.


Any consideration of the personal aspects of Nelson's life would be incomplete without reference to his somewhat turbulent love life that scandalised Georgian society; but I think seems to make him much more modern in appearance, being determined to acknowledge his emotional life as well as his professional responsibilities .

I have to express an interest at this point as my home town of Exmouth was the home of Lady Nelson during her estrangement from her husband and Carolyn and I were married in the church where Lady Nelson was buried. There are several blue plaques around the town that commemorate Lady Nelson's presence at that time.

But it was Emma Hamilton that captured the heart of Nelson and it was thoughts of her and their daughter that filled his concerns confided to Captain Hardy in his final moments aboard the Victory.

Emma Hamilton's hand writing takes more effort to decipher
Horatia Ward nee Nelson 1801 - 1881 daughter of Lord Horatio Nelson and Emma Lady Hamilton
Emma Lady Hamilton - Miniature that contained a lock of Emma's auburn hair.
Nelson wore this around his neck under his uniform. After death it was returned to
Emma by Captain Hardy.
Thus ended our visit to Portsmouth with still so much more to see and hopefully a future post following a subsequent visit that will complete my overview of a must see venue for anyone with the slightest interest in naval history.

Other references used in this post:
Portsmouth Historic Dockyard Souvenir Book
The Battle of Trafalgar - Geoffrey Bennett